Graduated Freshwater Necklace

khanzy

Well-known member
Joined
Dec 1, 2013
Messages
108
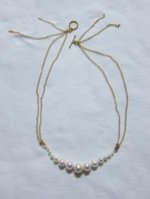
This is a graduated pearl and chain necklace I put together using some pretty freshwater pearls from RainbowIslandPearls on ebay, ranging from 3mm to 10mm. Inger was really kind and went out of her way to help expand this set of pearls from original earring sets (five pairs of matching pearls) into a bracelet/necklace arrangement with a center pearl. She even sent me some extras to give me more options!
IMG_2758.jpg

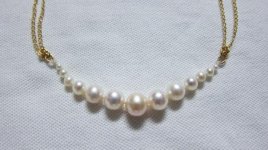
The center pearl is a light champagne while the others are whiter but also have their own range of overtones. Coming across these loose pearls was a huge coincidence since I was inspired by the graduation of the Dark Man Rises pearl necklace.
IMG_2759.jpg

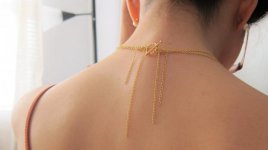
I still have to order french wire and adjust my knotting (Pattye's Beaders Secret thread) so that the knots aren't so exposed at the end, as well as making slight adjustments to the jump ring placement at the toggle. I left the extra chain at the back in an asymmetrical format because I thought they would create interest at the nape of the neck, but they tangle easily and need to be adjusted to lay properly.
IMG_2757 (2).jpg

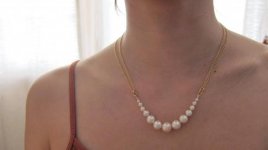
I also forgot that the toggle would add length so originally I had planned for the pearls to fall just below the collarbone and they are a little long here. I prefer the broader swoop of the pearls had the necklace been a bit shorter. All in all, I like my attempt but I will be doing a lot of tweaking!
IMG_2755.jpg

It's a little bolder than what I am used to - pendants - though in the same vein. I wondered if I should have maybe removed a pearl or two for a more understated look? Do you think the pearls look a little heavy next to the chain?

Alternately I could add spacers in metals or jewel tones to lengthen the graduation across my neck- it would be a completely different necklace!
 
Last edited by a moderator:
What a beautiful necklace in the making! I really like the glowing, luxurious "sweep" the pearls; shortening it a bit might just give you the wider sweep and balance you're looking for without having to change the number of pearls. The back chains are very pretty, but tangling or having to "fiddle with" them constantly would be distracting at best ... might it help to add a small pearl "weight" to the ends of the chains to help the chains fall better? All in, the bones of a gorgeous necklace :)
 
This is really beautiful. I like the idea of adding small pearls to the ends of the chains. Let us know if you attempt that.
 
Khanzy,

That is a charming and original design, including the draped chain in the back! I agree, pearls might help the chain from tangling.

To me, the size of the pearls and the length of the centerpiece seem fine with the chain. If the chain were slightly shorter, as CathyKeshi suggested, the pearl section would still end right at your lovely collar bones and drape beautifully! I do see the inspiration of the graduated SS necklace, but you've made it your own.

Glad you found RainbowIslandPearls (ebay), Inger is so helpful and honest.

Looking forward to what changes you decide on~and thank you for using Beader's Secret thread.
 
I am very happy to hear the advice you have all been giving! Will definitely pull in the chains by about an inch to adjust the balance of the pearls. There's not much tangle going on once the necklace is worn but it is a pain to detangle them before I put them on. I find that box chains are the best for not tangling but for this necklace I preferred the look of this particular chain.

CathyKeshi, I LOVE your idea about adding pearls to the ends of the chains- using them as little weights would be excellent! I think it would tie in the look much better as well with the symmetry and cohesion of the front and back both ending in pearls. I will have to request more pearls in that size from Inger, and figure out how best to attach them. The wire I have now might be too thick for the small pearls.

This also leads me to want to make a gold 'fringe' necklace that ends in pearls. It would be interesting to see how the chain will handle and dangle with this toggle and I can decide if that is a direction that is feasible. You are giving me so many ideas for projects!

I already ordered another graduated set so I can play with alternating crystals/stones between the pearls. I will have to wait and see which options there are for stones, any suggestions? I am leaning towards deep reds or orange-golds to keep with the warm tone.

Pattye, your thread is so easy to work with! Thanks again :)
 
Lovely design, lovely pearls, and beautiful owner! I can't tell you how much I love it - a winner all the way around. And you are new to this?!! :)

You mentioned knots being exposed at the ends. Is that gimp, or U-shaped metal findings? The gimp should be against the pearl with the thread cut off after knotting through two to three pearls. Was the hole too small to go back through? What we don't have here is a video of how to do the gimp/clasp. My memory fails me, but there is a thread with pictures somewhere here that would be very helpful. Pearl Dreams?

Make a knot near the end of your thread, and start with just the outer three pearls in reverse with a few inches before the knot on the end. When you pull all your thread out the end pearl (except that extra three or four inches), pull the gimp tight to the pearl as you go back through the pearl. You make your first knot when you get back through the first pearl, then go through the next pearl and make a knot, then the third - your length is short, so two is fine. Then cut off the thread and dab some clear flexible glue on the knot. Thread the rest of the pearls onto the cord and continue to the other end. Leave a little slack in the last two or three pearls so you will have room to knot when you go back through after pulling the gimp onto the last pearl. Jump rings are great and I have also used them decoratively in pairs as you have. If you use a clasp, you can thread through it and pull the gimp to the pearl so that there is no need for a jump ring.

The lovely graduation and luminous pearls are a focal point, and as such, they seem more beautiful than a whole strand. The dangling chains are the icing on the cake. Little pearls wired on with head pins would be nice, but you can also get findings, like tiny teardrops that can be attached with small jump rings. Once they are weighted, they shouldn't be tangling so much.
 
I walked away before I finished and missed your last post. Yes, it's very important to take into consideration the size of the hole where wire is concerned. I have bunches of pearls that I have set aside until I can get around to drilling larger holes. Like Wendy says: "Procrastination Calls"!
 
GemGeek, that is so kind of you to say! I have many ideas and inspirations that I am not really equipped to create because I lack the skills and tools to see them realized. So I feel like this is definitely a first step in that direction and also a great way to start with the support of all of you experienced professionals :) If there were a custom creation I would not be able to complete or if I just wanted better quality and construction, would you be able to direct me to artists open to that?

I am so excited to make the adjustments and add the pearls to the back! Inger might be sending more with my latest order, fingers crossed!

I looked at the Stringing Tutorial and tried it out a while ago, but I had difficulty trying to pull the last three beads through at the other end and knot them, my mind would get in a twist (pun?) about how to pull the beads through in such a tight fit. I will study Wendy's video and your advice and see whether I can get a better sense of how to do it!

I don't have french wire and since I couldn't figure out the knotting at the ends I strung the thread through U-shaped wire guardians and then knotted at the base before the first pearl. They are certainly obvious and I feel like my knots are the most awkward parts of my bracelets/necklace creations because I haven't worked with wire or figured out knotting with the gimp. There are two strands running through the pearls instead of four though I didn't check if the drill holes would take more. The knots are therefore smaller, though I don't know if they would be visibly larger if I used four strands like in the Stringing Tutorial.

Oh how I wish I could learn this in person! :confused:
 
Last edited:
I wonder if you might find the single silk method easier khanzy - perhaps my video will help you - it covers making a necklace right through including start and finish. (If you go to my homepage the videos are accessed via the top right 'information' box)
There are other technique videos there too and if you want any more just say and we'll see what we can do (always assuming we know how to do whatever it is!)
 
Just a suggestion~a crimp cover in gold color could be closed over the knot. The seams are almost invisible and could be turned to the underside. It would just look like a bead at the finish. This is if you haven't taken the necklace apart already. Even after one has learned a technique, there's often unexpected challenges that present during the application!
 
I wonder if you might find the single silk method easier khanzy - perhaps my video will help you - it covers making a necklace right through including start and finish. (If you go to my homepage the videos are accessed via the top right 'information' box)
There are other technique videos there too and if you want any more just say and we'll see what we can do (always assuming we know how to do whatever it is!)

Thank you, Wendy! I will take a look and give it some more tries! :)
 
Just a suggestion~a crimp cover in gold color could be closed over the knot. The seams are almost invisible and could be turned to the underside. It would just look like a bead at the finish. This is if you haven't taken the necklace apart already. Even after one has learned a technique, there's often unexpected challenges that present during the application!

Oh yes, for now I am keeping the necklace intact at the pearls, so that is an excellent idea. I will definitely get some appropriate crimp covers and see how that works. Will have to buy crimping pliers, too, and report back once all the adjustments have been made!
 
Great idea, Pattye! She's right - sometimes you just have to do it a certain way and follow with a crimp cover. Any pliers will work. Crimping pliers are for compressing crimping beads -- also good to have on hand. Fire Mountain Gems is a good website for crimp covers in 3mm. And they also sell G S Hypo cement http://www.firemountaingems.com/itemdetails/H201956TL

Probably because those end pearls are so small, you can't get back through easily. Even if you could get through one pearl, you could make the gimp work with a little glue. Use a smaller size thread and pull both ends against one side of the pearl as you put the needle in. That might help, or not. :) Trial and error is much easier for those of us who have accumulated a lot of supplies!
 
Look forward to that update, Khanzy; this necklace is truly lovely!
 
Khanzy, you usually have the make the hole of the last three pearls larger with a reamer for the thread to pass through.

- Karin
 
forgot to add...while learning to knot, and even for a while afterwards, clamshell crimp covers are your BFF! they cover all sorts of errors. especially if it is a piece you're just making for yourself - almost done with that 36 inch rope, when suddenly a knot slips and you have a gap in your strand? no do-overs - just cover/fill that gap with a crimp cover! just looks like a nice little random gold or silver bead. :)
 
Back
Top